Non-Destructive Testing Services

Versa Integrity’s advanced services offer various advanced technologies. These may be referred to as specialty inspections and consist of phased array UT, corrosion mapping, positive material identification, guided wave ultrasonics and tubular inspections (eddy current, remote field and IRIS).
Phased array ultrasonic testing (UT)
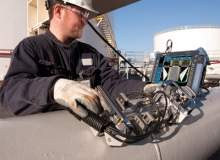
Phased array UT can be used for nozzle inspections and in-service examinations, as well as an alternative to radiography for weld inspection. It produces digital real-time results that are code compliant and suitable for archiving, and provides real-time control of focal length, focal spot and beam angles to customize and increase the speed of the examinations.
Benefits of using phased array UT include:
- Eliminates the risk of exposure to harmful radiation
- Safe technology that does not negatively impact production due to mandatory radiation boundaries
- High sensitivity to planar defects (cracks, sidewall lack of fusion, etc.)
- Improved detection in austenitic materials and dissimilar metal welds
Time of flight diffraction (TOFD)
TOFD is the most accurate ultrasonic method of measuring through wall extents and is highly adaptable to defect monitoring activities.
Advantages of TOFD include:
- High sensitivity to discontinuities
- Digital results that are suitable for archiving
- Safe technology that does not negatively impact production, due to mandatory radiation boundaries
Automated ultrasonic testing-corrosion mapping
Automated ultrasonic testing-corrosion mapping provides accurate thickness measurements, coupled with precise reading locations. Ideal for use on ferromagnetic and non-ferromagnetic materials, it can be easily adapted to corrosion monitoring programs on piping and vessels and has the capacity to inspect coated and non-coated items.
- Greatly increases the amount of available data, when compared with traditional manual UTT grids
- Digital real-time results suitable for archiving
- Reports that include easy to interpret color-coded overlay drawings that show thickness measurements, in relation to position on equipment
Guided wave
Guided wave is primarily used to inspect difficult to access piping systems in the oil and gas refining, petrochemical, storage, offshore and pipeline transportation industries, such as:
- Insulated pipe in refineries
- Offshore pipeline risers
- Cased road or railway crossings
- Above ground or buried flow lines
- River or bridge pipeline crossings
- Used as a locator tool for CUI
- Can be permanently mounted on buried pipelines for fast periodical monitoring
- In ideal conditions can test up to 175ft each way
Surface and tubular eddy-current testing (EC, IRIS, NFT, RFT, MFL)
Surface eddy-current testing is suitable for finding surface breaking flaws in weldments and base material, as it is faster than MT and PT methods. It is highly portable, battery operated and produces more accurate measurements and readings than conventional surface eddy current processes.
Benefits of surface eddy-current testing include:
- Sensitive to very tight cracks
- Can be used on any part that is electrically conductive
- Good for material sorting
- Can detect changes in hardness
- Array probes can provide an encoded C-scan presentation
- Custom geometry array probes can be made
In comparison, tubular testing can inspect locations that are difficult to access, as it can detect various forms of internal and external damage such as cracking, corrosion erosion, pitting, fretting and gradual wall. Array probes can be used to find the axial location of a defect surface laser mapping, producing a ‘digital pit gauge’ that creates a corrosion map of the surface scanned.


